A Samsung Galaxy S3 phone fell out of a car and was run over. It was completely dead, but the owner wanted to recover all of the phone’s photos and videos. FlashFixers was able to recover all of the phone’s internal data using the chip-off data recovery method.
In this post, we use the Samsung Galaxy S3 phone to explain the chip-off data recovery method. We detail the exact step-by-step process that we used to recover all of this phone’s lost data. The Samsung Galaxy S3 phone is similar to most Android phone models.
We recorded the chip-off process live as it happened, and this blog post is based on that video. The video timestamps are included so that you can easily cross-reference this post with the video.
But first, what is chip-off data recovery? And what phones are eligible for the chip-off data recovery process?
Chip-off data recovery is the process of removing a phone’s memory chip from its logic board in order to read the data directly. This method is the most reliable way to recover data because it works even when a phone does not work or is damaged beyond repair. The chip-off data recovery method is always successful if done correctly and if the memory chip is intact.
Chip-off data recovery works for any Android phone that originally came with Android operating system 5.1 or earlier, where the user file system is not encrypted. This includes any Samsung Galaxy S3, S4, S5, and S6, Samsung Note 5 and earlier, LG G4 and LG V10, Motorola Droid Turbo and Turbo 2, HTC One M8, and many others. Phones that are not eligible for the chip-off process, but are eligible for other data recovery techniques, include all iPhones, and newer Android phones like the Samsung Galaxy S8, S8 Plus, and Samsung Note 8.
 This Samsung Galaxy S3 phone fell out of a car and was run over. It was completely dead, but FlashFixers recovered all photos and videos from the phone’s internal memory using the chip-off data recovery method.
Chip-off Data Recovery in 6 Steps:
- Take the Phone Apart and Locate the Memory Chip
- Preheat the PCB
- Remove the Memory Chip with Hot Air
- Clean the Memory Chip With a Soldering Iron, Flux, and Alcohol
- Read the Memory Chip in a Socket Reader
- Extract the Data Using WinHex and SQLiteBrowser
The video begins by taking apart the broken Samsung Galaxy S3 phone. We will show you how we locate the memory chip, remove it using heat treatment, and clean it. We will use a specialized fixture to extract all of the data from the memory chip. After that, we will apply specific data recovery software to read and save the data.
Step 1) Take the Phone Apart and Locate the Memory Chip
(0:19) The Samsung Galaxy S3 comes apart pretty easily. It only takes a few minutes. For the S4 and S5 Galaxy phones, there’s a little bit more involved in taking them apart, but S3 phones and LG phones are pretty straightforward.
(0:24) We open it up and start removing all the screws.
(1:58) Once all of the screws are out, we can open up the phone and expose the logic board.
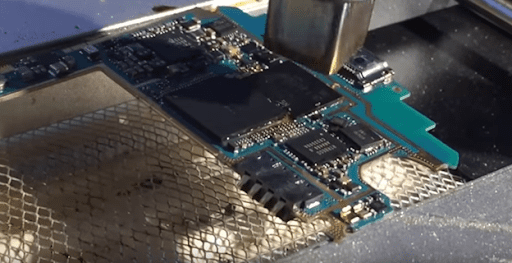
To get to the logic board, there are a few screws and connectors to undo. Once those are removed, the logic board is freed. (2:30) We take off the camera components in preparation for the next step because they don’t do well with the heat.
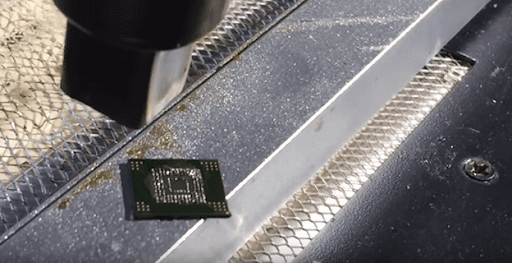
(2:38) On the back of the logic board, the underside of the board, you can see the memory chip. It has a sticker label on it.
(2:50) The memory chip is soldered to the board, but it also has underfill on it. Underfill is a hardened adhesive – like an epoxy – that manufacturers use under a chip to increase rigidity, transfer heat more efficiently, and dissipate mechanical stress throughout a device’s package.

Remove screws from the Samsung Galaxy S3 Phone.

Remove the back of the phone to expose the logic board.
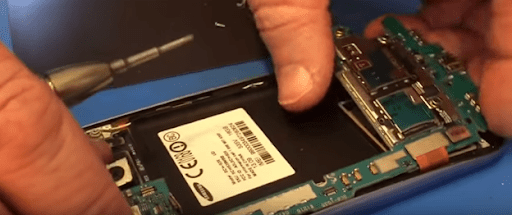
Remove the logic board.
The tool points to the location of the memory chip on the logic board.
Step 2) Preheat the PCB
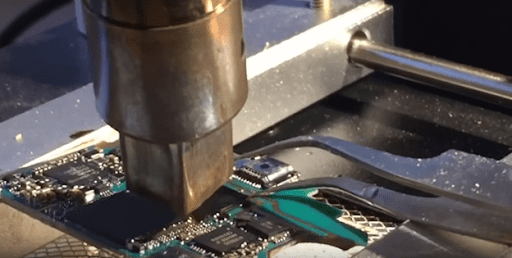
(3:04) Next, we’re going preheat the logic board or PCB (printed circuit board) with the memory chip still on it. This is going to soften the underfill and allow us to use less top-hot air to take off the memory chip.
Once the preheater is on and set up, we put the logic board in the fixture. We let it heat up for 5-10 minutes at 400 degrees Celsius.
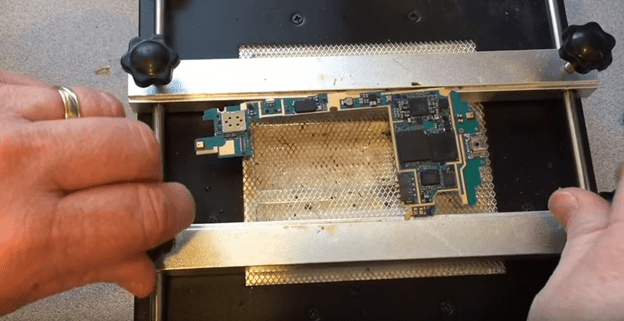
Use a preheater to preheat the logic board.
Step 3) Remove the Memory Chip with Hot Air
(This section of the video is difficult to hear because the hot air blowing is very loud.)
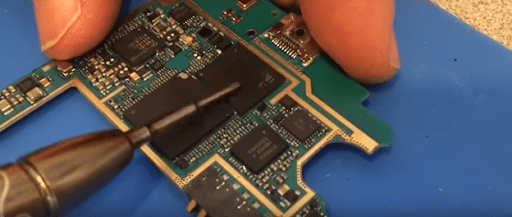
(3:25) Here, we are using top hot air and flux to promote the melting of the solder and improve heat transfer. For top hot air, we use a Hakko Hot Air Station. This flux is from Amtech NC-559.
We apply the flux around the edges of the memory chip and carefully apply the hot air to promote melting of the underfill. You might see some smoke here. This is normal. Note that this process is done in a vented area since the melting flux and underfill can give off a strong smell.
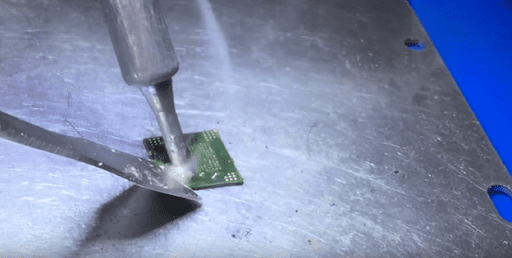
(4:00) We use these long curved, pointed tweezers to gently lift the memory chip off the board. You can see the resistance from the memory chip. It is resisting not only the solder but also the underfill. We can also use the sharper edge of an X-ACTO knife. You don’t want to take the memory chip off before the solder balls underneath have melted and the underfill is liquid. Otherwise you might damage the pads from the chip, making it impossible to read.
(4:58) Once the memory chip is off the board, we let it cool off for a few minutes. Then we can power down the equipment.
On the underside of the chip, you can see that one corner has a different pattern, an extra pad. This is used to orient the memory chip in the fixture.
Add flux around the edges of the memory chip to promote melting of the underfill.
Use top hot air to promote melting of the solder in preparation to remove the memory chip from the logic board.
Attempt removal of memory chip with tweezers.
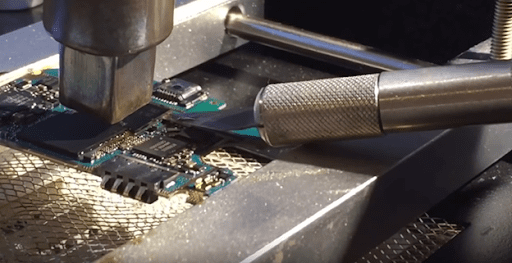
Attempt removal of memory chip from logic board with shard blade.
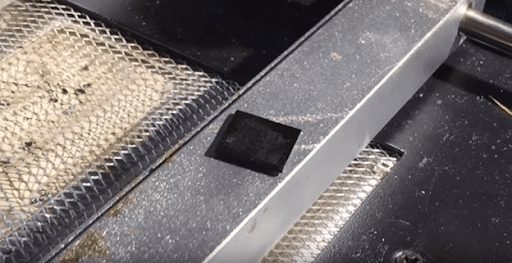
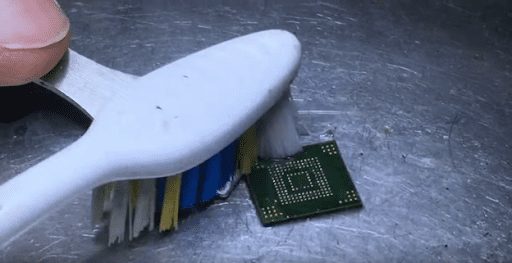
Remove the memory chip from the logic board (front).
Remove the memory chip from the logic board (back).
Step 4) Clean the Memory Chip With a Soldering Iron, Flux, and Alcohol
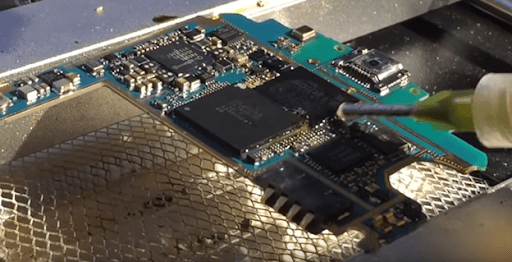
(5:15) With the chip off and positioned under the microscope, we are set up to clean the chip. We’re going to use a flat tip soldering iron, flux, and rubbing alcohol.
First, we’re going to get rid of this underfill. We apply the flux. The flux will heat up with the soldering iron and combine with the underfill making it easier to clean off.
We are using a nice flat soldering iron tip to get that gook and underfill off. We’re using the flat part of the angle iron to push through the underfill.
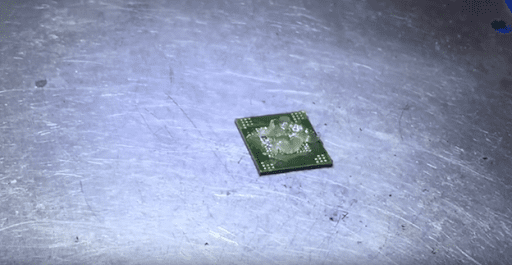
(6:35) The underfill combines with the flux to make something that you can just clear off. After clearing the underfill, e we use rubbing alcohol, and rub with a toothbrush to clean off any residue.
This memory chip cleans up nicely. You can see the nice, shiny test points where it will connect to the fixture. We make sure to clean up around the edges too because otherwise the chip won’t sit evenly if there’s any of underfill or flux still on the edges.
We will dry off the chip and take it over to the fixture so we can read the data.
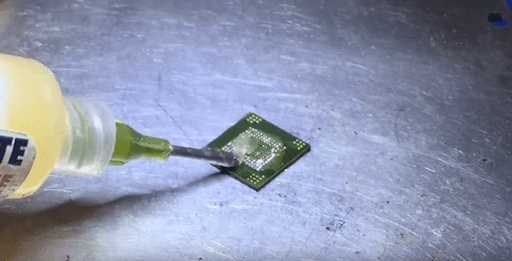
Add flux to memory chip.
The flux will make it easier to remove the underfill.
Use a flat tip soldering iron to heat the flux and underfill.

The flux combines with the underfill, which can then be easily removed.
Use a toothbrush and rubbing alcohol to clean the memory chip.
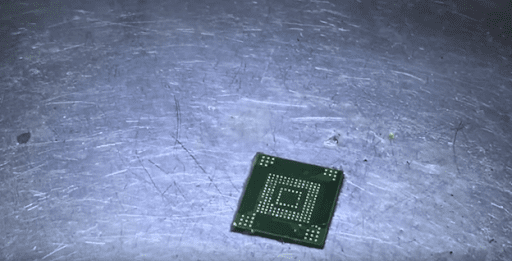
The memory chip is cleaned and ready to be read.
Step 5) Read the Memory Chip in a Socket Reader
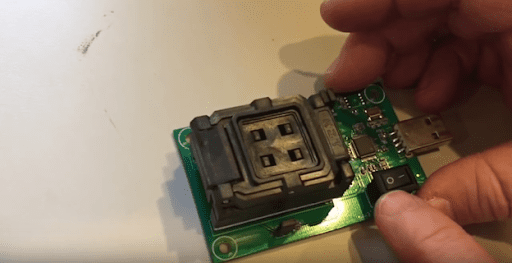
(7:22) To read the memory chip, we use sockets from KZT Socket. What’s nice about these sockets is that they are a combination socket, where you can have one board but different combinations of socket heads. This allows you to work with a variety of different sized memory chips. We have three sockets: eMCP162/186, eMMC169/153, and eMCP221 data recovery. These are from ALLSOCKET.
(8:38) The fixture we’re using for this Galaxy S3 is an eMMC 169/153 for a 11.5mm x 13mm size chip. It is the most common size and also fits LGs, Motorola Droid, HTC One, and many other models. The corner with the extra pad shows the proper orientation of the eMMC memory chip in the fixture.
(8:46) The nice thing about these sockets is that these outlines are interchangeable. You can actually put different sized chips in here, and it will accommodate the same pinouts on the fixture head. This is an 11.5mm x 13mm outline; but you can go up to 12mm x 16mm, and there are some smaller sizes too. There are four or five different sizes for each fixture head, which allows you to fit just about all the phones (using Android operating system 5.1 or earlier) in the combination of the three socket heads.
(9:23) We’re looking for pin 1, which is in the corner where you can see the little extended pad. We match it up with the arrow, and then snap it down. When we turn it on the power to the switch, the fixture starts receiving power from the USB port and is recognized as a USB device by the computer.
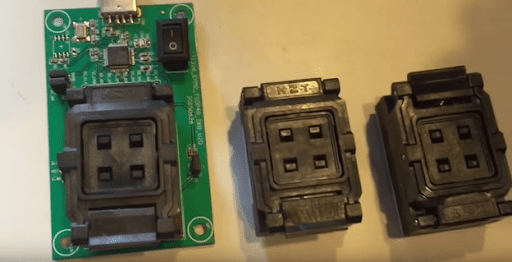
Three socket readers commonly used for data recovery

A view of the memory chip and the opened socket reader
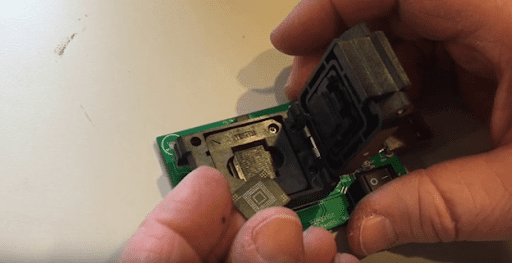
Identify the correct orientation of the memory chip.
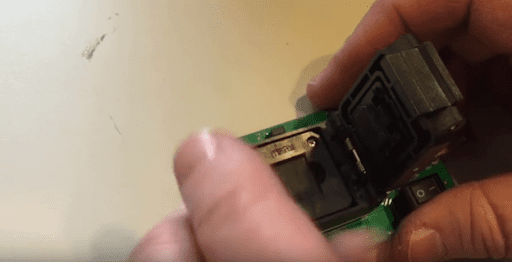
Insert the memory chip into the socket reader.
Close the socket reader, plug into the USB port of a computer, and switch on the power switch.
Step 6) Extract the Data Using WinHex and SQLiteBrowser
Here, we show you how and where to extract the photos, contacts and text messages from the Android file directory using WinHex and SQLiteBrowser.
How to Extract Photos Using WinHex
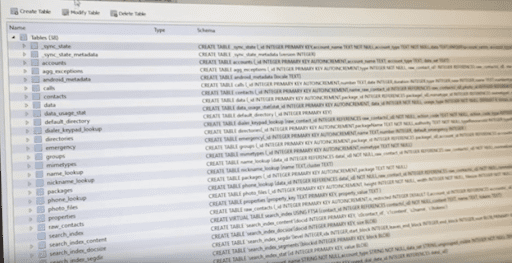
(9:56) When we open the device in WinHex, and we’re looking at tmany different partitions. The largest partition is the user data, which in this example is 12.2 GBout of the 16GB chip capacity. We open that partition to display the file system.
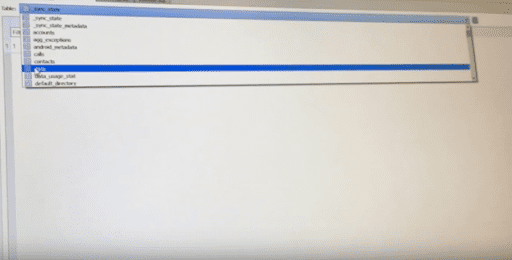
To get to the photos, we look in the /media folder. There might be another folder called /0– each one is slightly different – but in this case, we’re just going to go right to /DCIM and /Camera. All the camera pictures are here, ready to be copied and saved.
We’re using WinHex to view the file system, but RStudio works very well as does using Linux itself.

Use WinHex to identify and open the user data, the largest partition on the memory chip.
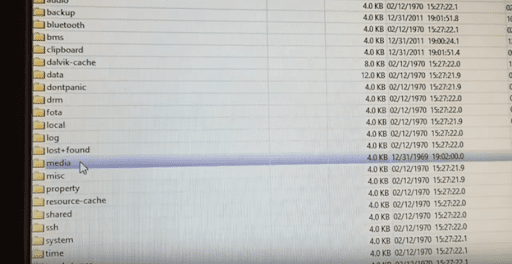
Navigate to /media/DCIM/camera.
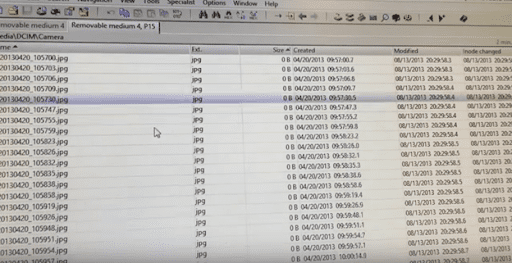
The images are ready to be copied and saved.
How to Extract Contacts and Text Messages Using WinHex
(10:54) Now we’re going to get contacts and text messages. These are in a different folder called /data. So starting with /data, the contacts are going to be in a folder called /com.android.providers.contacts. Open that up, go into the /databases folder, and look for this database: contacts2.db. This is where all of the contacts are saved. We’re going to save it to the desktop.
These .db files are all SQLite databases. We can use another program such as SQLite Browser to do an export and make them readable. For example, we can turn a SQLite .db file into a .csv file that can be read in Excel.
The text messages are typically in a folder, /com.android.providers.telephony. We open that folder, go to the /databases folder, and then find and save this mmssms.db file. This is where all of the text messages are stored.
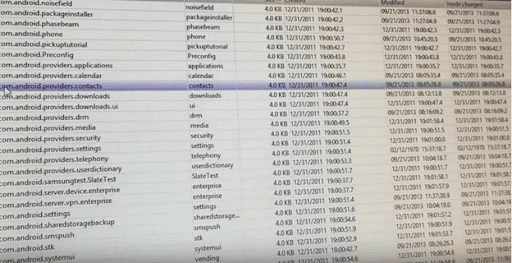
Navigate to the /data folder, and then to the /com.android.providers.contacts folder.
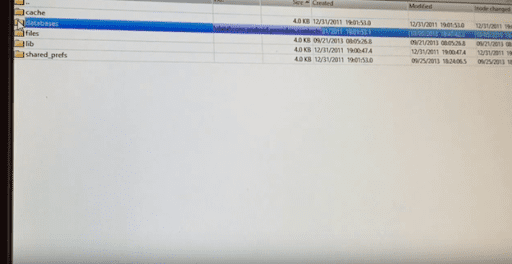
Open the /databases folder.
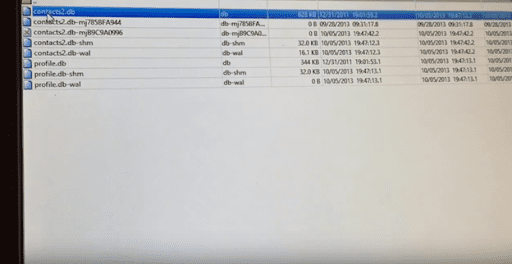
Find the file named contacts2.db.
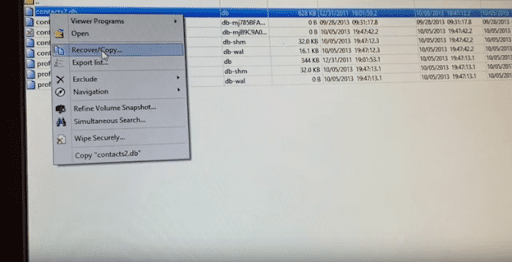
Right-click the file and select Recover/copy.

Save the file. Here, we are saving it to the desktop.
How to Read Photos, Contacts, and Text Messages Using SQLiteBrowser
(12:10) Next we’ll open the SQLite program, SQLiteBrowser. We use this program to take the .db files that we just saved and turn them into .csv files that can be read in excel.
In SQLiteBrowser, click on the “Open Database” tab. We’re going to select the database we just created, contacts2.db.
When the .db file loads, we see this long, long table. But we’re just going to look for browsing the folder called /data. To do this, click on the “Browse Data” tab, then from the drop down menu, select the folder “data” to browse. (12:54)
From here we can export the data as a .csv. To do this, we click on file > export > table as CSV file. After we export the data as a .csv file, we can then import it into Excel. And there all of your contacts and phone numbers from the database will be visible on a spreadsheet. The same process works for text messages. We open the mmssms.db file and save that as a .csv file as well.
Use SQLiteBrowser to open the database file you just saved.
Click on the “Browse Data” tab, and select the folder named “data.”
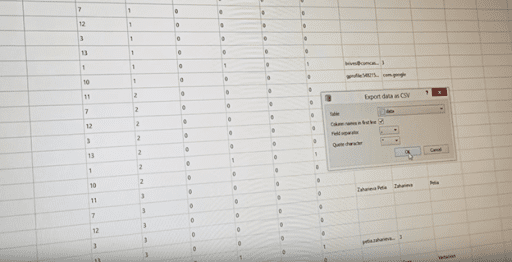
Export the data as a .csv by clicking File > Export > Table as CSV file. Import this file into Excel to see all of the data visible on a spreadsheet.
If you have a phone that you need to recover data from, FlashFixers offers affordable data recovery services for Android phones, iPhones, and other digital storage devices. Call today or send a message to us info@flashfixers.com.